Understanding WebPal Admin Functions
WebPal offers a number of administrative functions. See the admin options below.
Monitor Usage
Track your server usage and user activity with usage reports.
Add and Remove a User
Add a new user to the WebPal Docs. Set up general roles for users by enabling or disabling administrative access.
Set up Groups
Set up groups so that users can collaborate and share documents.
Add and Assign Shared Drives
Add and assign shared drives and determine permissions users have within the drive.
Manage Sites
Import new sites, update and add users, and easily add a publish destination to your website.
View the Activity Log
Learn how to navigate through the Activity Log to view and export admin and user activity.
Usage Reporting
Tracking your server usage and user activity is done through Usage Reporting.
Disk Usage
The chart represents the total used and free disk space.
Disk Usage by User
Track usage by all users within your server.
Most Active Users
See which users have the most frequent activity by viewing the number of actions.
Managing Users
As an Admin, you can add users, set up general user roles, and assign users to groups, shared drives (aka shared folders), and websites.
Adding a New User
- To add a new user, begin by clicking the "Add" button from the Users section as shown above.
- Enter the username that applies to the new account (this can be a single word or an email address). The user's settings will open up which can be seen below.
User Properties
- In User Properties Enter the first name, last name and email and update the password.
- Click "Save" and the "Send Login Details" button will appear. Click this button if you would like to share the login information with the user at this time. NOTE: As an Admin, you can always reset and send user passwords at any point.
Groups
- Select the group(s) which you would like to assign the user to. Learn more about groups here.
Shared Drives
- Select the shared drive(s) which you would like to assign the user to. Learn more about shared drives here.
Websites
- Select the website(s) which you would like to assign the user to. Learn more about managing websites here.
SSH Key
An SSH Key is automatically issued upon the creation of the user.
Groups
Utilizing groups in WebPal is a great way to organize and share files amongst departments and teams.
Creating a New Group
- To create a new group, select the "Add" button in groups.
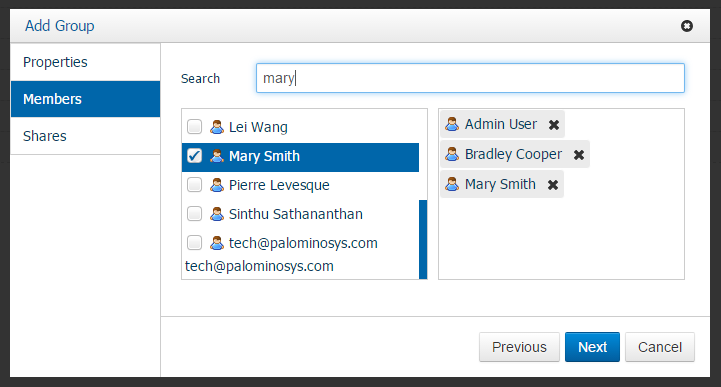
- The "Add Group" window will appear as shown below. Enter the group name and a description of the group.
- Search and select the members that you would like add to the group.

- Click "Next" and your new group has now been created!
NOTE: To edit the group details and to add or remove members, simply double click the name of the group from the list and the same properties window will open.
Shared Drives
Create a new shared drive and grant access for WebPal users. This folder will appear as a drive in the user's account.
Adding a Shared Drive
- To create a new shared drive, select the "Add" button in shared drives.
- The "Create a Shared Drive" window will appear as seen below.
- Select the root folder that you would like to create the shared drive in.
- Assign a name to the shared drive.
- Add permission levels by selecting the checkbox next to the permission. The minimum permission will be to view and download documents.
- Select users to share the drive with from the list or search by username.
- Click "Create Drive" and your folder will now appear in the users docs.
Manage Sites
Import new sites, update and add users and easily add a publish destination to WebPal Sites.
Adding Users to WebPal Sites
- Begin by selecting the site you would like to add a user to
- Select the "Add" button on the right hand side of the users list.
- Search or select users by name from the "Add User" window
- Click "Add" and the user will now be added to the list.
NOTE: To remove users from accessing the site, simply select the username and click the "Revoke" button.
Publishing Sites
When you are ready to publish your website for the first time, you will need to add a publish destination. WebPal can publish your site from any cloud or hosting provider.
- Begin by clicking "Add Publish Destination"
- Click the "Update" button from the Publish Connector window.
Monitoring the Activity Log
Navigate through the Activity Log to view and export admin and user activity.
The activity can be arranged by user, time, action, object, or details by selecting option in the gray bar.
NOTE: To export the activity log simply click "Export" and an Excel spreadsheet will be created and downloaded to your local files.